
Moira
Moira is a top down sci-fi themed shooter game from Eucleia Studio. My role on this project was to program all of the UI elements and help drive the overall UX. I partnered closely with the lead game designer and UI Designer to accomplish this task.
Keep scrolling to read more about how I programmed the HUD for Moira.
Eucleia Studio
Team Size: 5 people
Project Duration:
3 Months
Role:
UI Programmer / UX Designer
PLAYER HUD
My first task for Moira was to program the HUD Functionality. I was given access to the GDD with a rough mock up drawn by the lead game designer which looked like this:

This was a useful starting point and so I used some placeholder assets (a mix between items I found on Game-Icons.Net and things I created in Adobe XD) to start programming the functionality. I wanted to tackle the easy things first, so I attacked the Health and Ammo Displays first.
Health Display
The Health display code is simple and straight forward health display code.
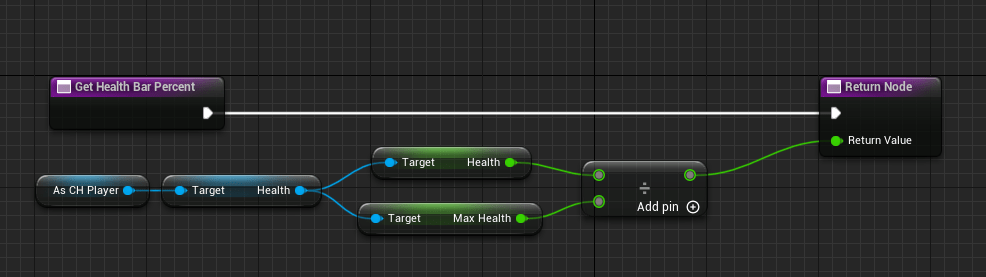
The UI blueprint has a reference to the player that is collected on Construct, so I just use that reference to get the players health component, then take the health value and divide it by the max health value. Very straight forward.
There is also a number associated with the players health, it’s not just a bar. So there was an additional function I created called “GetHealthNumber” that displays the player health as an integer (rounding from the float variable found in the player character.

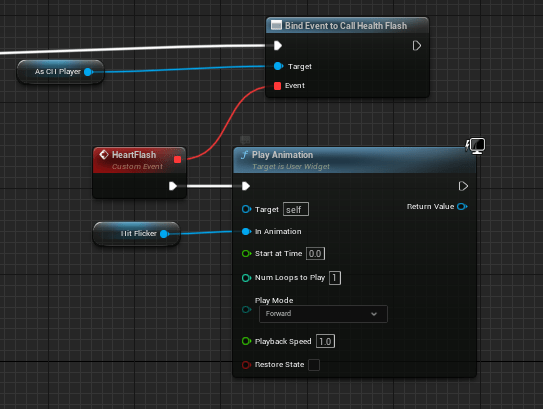
So, now I had the health display pretty much complete, but there was one more requirement this section of the HUD. There is a little heart below the number on the health display that needed to flash when the player was hit, and go back to the neutral blueish white color after a few moments.

This piece didn’t require any coding. Instead, I just created an animation that first changed the color of the heart from blueish white to red, and also alternated it’s visibility between visible and hidden for about a second to get this effect.

This animation is played when an event dispatcher is called on the player when hit. I called the event dispatcher “Health Flash” and call it when the player is damaged (adding it to the logic of the “Event AnyDamage” function on the player character.
When this event is called, it triggers an event on the UI called “Heart Flash” which plays the animation.

That’s it! We’ve finished out the Health Display!
Now moving on to the ammo displays…
AMMO DIsplays
First things first, there are two ammo displays in this game. One for regular shooting weapons and one for throwables. Let’s talk about the regular shooting weapons first as they are the most straight forward.
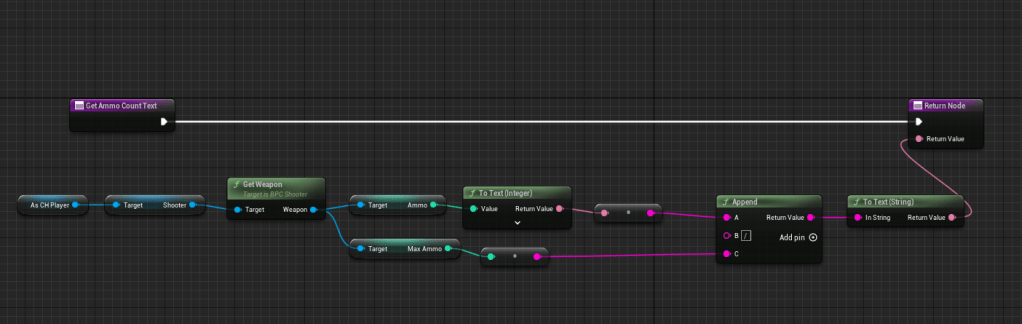
On the player character, there is a Shooter component which stores the weapon equipped and the amount of ammo it current has, in addition to the maximum ammo. The requirement here was to not only display the amount of ammo left, but also the max ammo a weapon can have. This was as simple as getting the shooter component, and the weapon from the “GetWeapon” function, then from there, getting the Ammo and Max Ammo variables. I just appended those together with a “/” simple in the middle and returned it. All of this happens inside of a function called “GetAmmoCountText” which the AmmoCount text object on the HUD is bound to.

The other component of the ammo display is the image that shows the player which gun is currently held. This is just an image object on the UI that is bound to another function called “GetEquippedWeaponImageBrush”.
As with the ammo count, this brush will come from the shooter component on the player, get the weapon, and get the weapon image variable that from that weapon. I had to manually add all of the images for each weapon to their blueprint, but after that, it was just as simple as binding the function to the image on the UI.


This is essentially the same logic that the throwable uses as well, so I won’t rehash it here. Let’s move on to the objective display!
Objective DIsplay
Moira has a consistent objective indicator to remind the player what their current goal is. This is displayed in the top left corner of the HUD. This is mostly just graphic, but there is one piece that required code, and that was getting the current objective and displaying it to the user.
This is a relatively simple function that just gets a text variable from the Trigger Manager component on the player character and displays the content:

Weapon Wheels
The final, and most complex portion of the HUD was the weapon wheel display. This one has a lot of moving parts and design elements, so it was a challenge to get right.
The first thing that I did was set up a second canvas inside of the main HUD. This canvas stores all of the information on each weapon in the wheel which includes each weapon image as well as highlight effect images for the wheel.
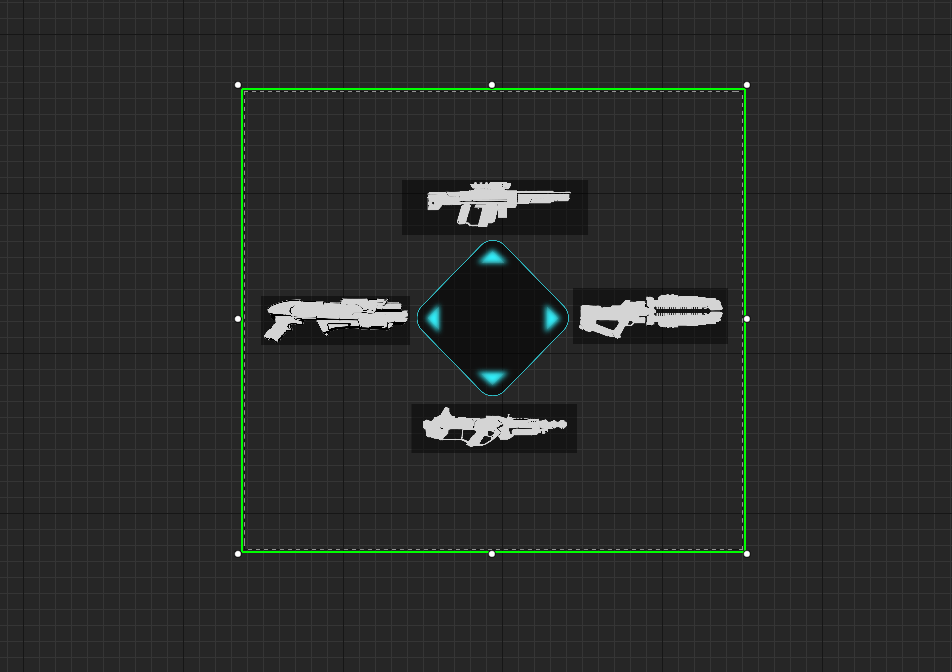
The design was fairly straight forward, I just added the gun wheel object in the center of the canvas, and positioned each gun image around it with a background image behind each one. In addition, there is also a “glow” that was required to show up on each image when the gun is moused over, both in the arrow as well as the background of each gun. The glow is supposed to show up when the player mouses over each gun, so I just used a UI button asset for each and put them behind both the background images and the gun image, and set the image to none on normal and set it to glow on hovered.

The next piece was writing the logic for the arrow itself to glow when an item was hovered which required a few steps. First, I had to use an image that overlayed on top of the gun wheel to give each arrow a “glow” effect when hovered, and set each image to “hidden” as the initial value so that the glow effect doesn’t show up when the wheel is first displayed.
Then, I had to create a map on begin play that takes all of the UI buttons described above as keys and the arrow “glow” images as values.
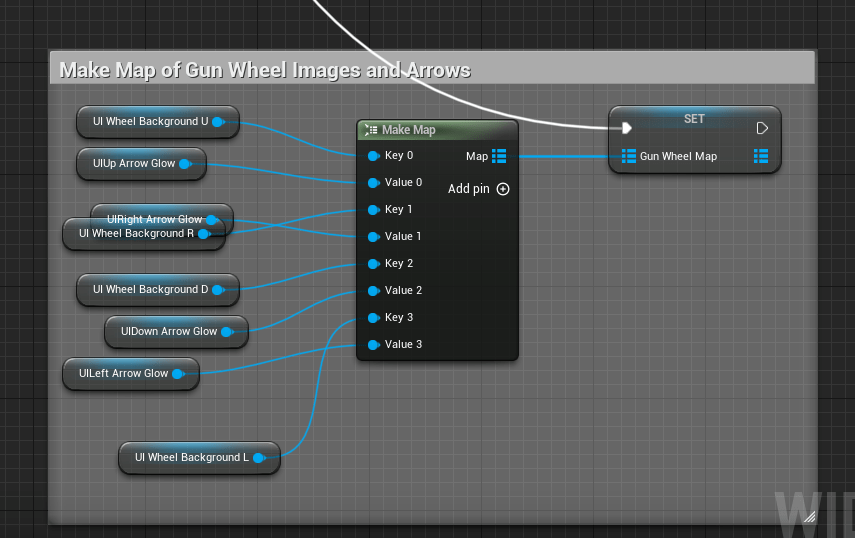
From here, I created a function that basically loops over the gun wheel map, finds the array element that is currently being hovered over, and then finds the corresponding value and sets it’s visibility to true if it is being hovered. In addition, there is an additional variable that is set on the player character, which is just an integer that stores which image is being hovered. This is used to select the gun for the player at runtime, but you’ll see more on that later.

If that’s confusing, here’s what it looks like!
From here, the main thing left to do is make it functional. Of course the purpose of the weapon wheel is to equip weapons, right? Well in order to do that, we need a few things. First, there needs to be an input that will bring up the weapon wheel.
To program that, I went to the player character blueprint and created an Input Action for it. We are using the enhanced UE5 input system, so I first had to create that input action and add a trigger for release as the first index slot. This is so that the weapon wheel will disappear when the input is released.
From here, I had to create a few event dispatchers. One for calling the weapon wheel, and one for removing it. Also, for a touch of UX, the time dilation is set to .2 on call, and back to normal on release! (Think what happens in Uncharted when you bring up your weapon wheel!)

Going back over to the HUD blueprint, I had to do something with those event dispatchers, right? Of course!
On begin play, I just bound each dispatcher to events on the HUD blueprint. On create, the mouse cursor is shown, and on remove, it disappears (this is a temporary UX solution that will change later, but it’s ok for now!).

The last thing… making sure that the weapon wheel actually equips a weapon. Remember that int variable I stored earlier, the one that corresponds to the index of the hovered gun image?

Well, that variable is passed to the player character when the remove event fires, and based on what was hovered over, the corresponding weapon is equipped.


There’s some other logic that controls the gun that is created… but that’s the gameplay programmers job!
Just like the Weapon Display, this same process repeats for the throwables display, so I won’t repeat it here.
WRAP UP
So, that was a long article! In the end, I programmed Health Display, Ammo Display, Weapon Wheel and the Objective Display!
Thanks for reading, and stay tuned for the next article on UI programming for Moira!
